One of the handiest tools in the wood shop is the table
saw. When working with replicating multiple, small pieces of stock, a sled
makes the job easier. Stock can be placed against the sled’s rear wall and then
the whole sled is pushed into the blade. Clamp a stop piece of wood on the back
wall of the sled and you are guaranteed consistent cut lengths.
When the sled had its runners I tested it on the table
saw. It slid without any binding and it didn’t wiggle from left to right as it
slid. A critical step in building the sled is to attach the rear wall so that
it is at right angles with the saw blade. To do this, I placed the blank
pressboard, with attached
runners onto the saw with its blade lowered. I then powered
up the saw and slowly raised the blade through the pressboard. This action
produced a blade reference line which I could then use a carpenter’s square to
line up the rear wall. The two walls need to be attached on each side of the blade’s cut line in order to keep the sled from falling apart the first time
the walls are run through during a low
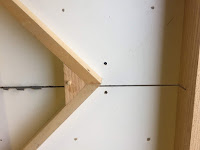
profile cut.  I put together a templet that looks like half of a
picture frame. This 90 degree piece was cut with equal leg lengths and the end
of each leg was cut with a 45 degree angle. The templet can now be placed on
the sled and it will form a back stop for cutting frame wood. I drilled a 1/4 “
hole in the middle of the templet’s reinforcing center piece. I then aligned
the templet to the left and right edges of the sled’s rear wall. I drilled two
1/4 “ holes into the sled, using the templet hole as a drill guide. I then glued a
peg into the templet which extended from the bottom by 1/4 “. The frame templet
can now be pegged to the sled for either a right hand, or a left hand 45 degree
angle cut. The mark on the wood to be cut is simply aligned with either the
right or left edge of the sled’s blade slot. With the templet pegged to the far
edge of the sled, the frame wood gets cut without any need for the blade to
contact the templet.


No comments:
Post a Comment