Friday, August 24, 2018

Frame Maker


              One of the handiest tools in the wood shop is the table saw. When working with replicating multiple, small pieces of stock, a sled makes the job easier. Stock can be placed against the sled’s rear wall and then the whole sled is pushed into the blade. Clamp a stop piece of wood on the back wall of the sled and you are guaranteed consistent cut lengths.
            I made this sled from scrap 3/4 “ pressboard. The front and rear walls are 3/4 “ hickory. I had a stick of wood that was just about the perfect size to use as slide runners on the bottom of the sled. After passing the stick through the planer, its dimensions were perfect. To attach the runners to the bottom of the sled I sprayed the contacting side of each runner with 3M contact glue. I then put the runners in the table saw’s slots and aligned the sled on top. When I lifted the sled from the saw top the runners were in place and aligned. I clamped each runner while I secured it with a couple of recessed screws.
            When the sled had its runners I tested it on the table saw. It slid without any binding and it didn’t wiggle from left to right as it slid. A critical step in building the sled is to attach the rear wall so that it is at right angles with the saw blade. To do this, I placed the blank pressboard, with attached
runners onto the saw with its blade lowered. I then powered up the saw and slowly raised the blade through the pressboard. This action produced a blade reference line which I could then use a carpenter’s square to line up the rear wall. The two walls need to be attached on each side of the blade’s cut line in order to keep the sled from falling apart the first time the walls are run through  during a low profile cut.           
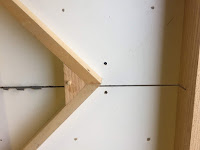
            A popular décor need is to be able to build frames. With a wood shop equipped with necessary tools, why would you need to purchase a frame? The frames can also come out of your shop having any odd dimension that is required. Now, to come up with a way to use the table saw sled to produce accurate 45 degree cuts.            
            I put together a templet that looks like half of a picture frame. This 90 degree piece was cut with equal leg lengths and the end of each leg was cut with a 45 degree angle. The templet can now be placed on the sled and it will form a back stop for cutting frame wood. I drilled a 1/4 “ hole in the middle of the templet’s reinforcing center piece. I then aligned the templet to the left and right edges of the sled’s rear wall. I drilled two 1/4 “ holes into the sled, using the templet hole as a drill guide. I then glued a peg into the templet which extended from the bottom by 1/4 “. The frame templet can now be pegged to the sled for either a right hand, or a left hand 45 degree angle cut. The mark on the wood to be cut is simply aligned with either the right or left edge of the sled’s blade slot. With the templet pegged to the far edge of the sled, the frame wood gets cut without any need for the blade to contact the templet.        

Making Music


            Everyone had a difficult time during the American depression years.  The 1930s saw a resurgence of homemade musical instruments. Times were hard in the American South, and sitting on the front porch singing away the blues was a popular pastime. Musical instruments were beyond the means of most people, but with an old cigar box, a piece of broom handle and a couple of wires from the screen door, a guitar was born. 
I have made a couple of guitars out of cigar boxes. My favorite one is a single stringer. I am a former band student and I learned music on the coronet. The coronet, of course, only plays one note at a time. Playing chords is not an instinctive thing for me
Until a grandson took up band, and needed a coronet, I used to keep the horn in the man-cave.  There I would occasionally relax in my old office chair and pick up the horn and blow some familiar old tunes. Having given up the instrument to a greater need, I was without a tune maker. This wasn’t good.
A Trip one day through central Oregon, on our way to Ontario, found us stopping at a tree shaded one-business village. The café/curio shop had a collection of nice sized cigar boxes. I bought a couple of the boxes with the intention of making a guitar. As I drove on the design began to form in my head.
The first cigar box guitar hangs in the man-cave and I often lift it down to see if it still plays a good tune. It is ugly, but it is happy with the notes that I strum. I wanted to build a three-string guitar so that I could teach myself some simple chords.
Recently I found myself without a woodworking project. I had some nice scraps so I decided this would be a good time to build my own home designed cigar box guitar. This instrument would be a three-stringer with a round, two inch thick body or sound box.
I began with 2 inch wide strips of 1/16 “ hickory to form the round walls of the body. After soaking the strips in the bathtub for a couple of hours they easily formed a circle when placed inside a 10” embroidery hoop. I let two of the loops dry overnight. When the hoop was removed, the hickory had taken on the circular shape I had wanted.

After laminating two of the loops I had a 1/8“ thick, by two inch wide wall. To the wall I glued a thin laminated piece to the bottom and a 1/8 “ thick surface to the top. Add the neck piece to make a 27” instrument, fashion a bridge and a nut, add three old tuners and I had fashioned my own cigar box guitar.  Now, I need to pay attention to the chord charts.


Sunday, August 5, 2018

Weed Buddy

I had just fixed a lawn sprinkler. I used a pair of pump pliers to turn the sprinkler head. Heading back to the garden shed to put tools away, I noticed a bit of weed grass in the lawn. This is the type of weed that stays low and doesn't present a stalk which one can grip. I had just mowed the lawn and there was no grabbing this weed with my fingers.

I had the pump pliers in my hand so I knelled down and shuffled in the grass to find the center stalk of the weed. I jabbed the pliers to the dirt and closed around the weed. To my surprise, the weed grass pulled out easily and it came with roots.

I tried a couple more weeds and I found that sometimes the pliers didn't grab low enough and I just ended up breaking the stem. I needed something similar to the pliers, but with a broader grip surface and the ability to jab into the dirt to guarantee getting roots and all.

I had a spare pump pliers, and I had some thin flat-stock steel. I fashioned two spearhead shaped pieces of steel. These I welded to the jaws of the pump pliers. I added some gripping friction by gouging a few lines onto each head with a Dremel bit. A quality welder I am not, but the pliers left the bench vise with enough weld on each grip to meet the task. 


I took my new Weed Buddy to the back lawn where I put it to a thorough test. The pointed heads stuck easily into the dirt. The gouged surfaces let nothing slip away. The added width made jabbing at the precise center of the plant less important. The pliers are built to be easy to grip and the handle length means little gripping pressure is required. I didn't experiment with the pliers' ability to adjust in width, but that may not be an important feature.